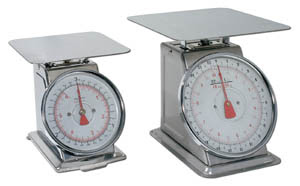
Powerful of Weighing Scale

As everyone know, weighing scales are used to determine the weight of an object, but do you notice that weighing scales can use for counting applications such as papers and coins, determine purity of precious metals, identify gold karat, measure density, measure volume, calculate Basal Metabolism Rate(BMR), calculate body fat and so on. It used for many applications and purposes. Below are several sample of powerful weighing scales and it usage.


1) Alfa Mirage GK2000 - Precious Metal Karat Tester

Quickly, easily and accurately determine purity of precious metals and gold karat range from 9 to 24K by two weighings(By measuring the Specific Gravity of the sample) :

a) One with the piece in a water tank
b) The other normally.

An internal computer does all the calculations for you. It can distinguish the real precious metal from the fake material. No acid, needles, or test stones needed.


2) Tanita BC542 - Full Composition Body Scanner

Tanita Body Composition Monitors provide in-depth body composition information to help you monitor your family's diet, health and fitness. It uses Bio-electrical Impedance Analysis (BIA) to give you information about your weight, body fat % and total body water %. Other features include:
  • Children's Healthy Body Fat Percentage Range
  • Visceral Fat Rating
  • Bone Mineral Mass
  • Basal Metabolism Rate (BMR)
  • Metabolism Age
  • Muscle Mass
  • Physique Rating - 1 to 9 descriptive scale

3) Shinko Denshi DME Series - Electronic Density Meter

DME Series designed to measure the Relative Density for the Rubber & Plastic. It is suitable for quality control. It determine the Relative Density by two weighings:

a) Weight a sample in the air
b) Weight a sample in the water

Besides that, it also can accurately measure the volume of an object.


4) Ohaus MB45 - Moisture Analyzer

The MB45 combines state-of-the-art heating with highly accurate weighing technology to deliver a faster, more precise method of moisture analysis. Perfect for environmental, quality control, food and beverage, chemical, pharmaceutical industries, and more.

  • Superior analytical performance, with readability of 1.0 mg, 0.01% moisture and 45 gram capacity
  • Round Halogen Lamp with ramped voltage increase enables rapid uniform heating of sample to 200 C
  • Moisture Range start from 0.01% to 100%


5) Digi DC-190 - Counting Scale

DC-190 series counting scales adapt easily to your counting applications. High accuracy with 1,000,000 counting resolution. Independent displays for weight, piece weight, and quantity.


6) Mettler Toledo XP2U/XP6U - Ultra micro balances

The Mettler Toledo XP series is an innovative ultra-microbalance, providing optimal weighing performance, user friendliness and quality standards. The Mettler Toledo XP6U is the top level ultra-micro balance with unmatched 61 Mio digits resolution. Readability up to 0.0001 mg.


Weighing scale shown above can get at here

Weighing Scale / Instrument


Weighing scale or common know as scale is one of the measuring instruments. It used to determining the weight or mass of an object. For common people, their knowledge about weighing scale are only instruments that are use at markets or retail stores to determining the weight of vegetables and use at hospital to determining the weight of bodies. Actually, weighing scales are one of the important instruments that needed in every industries such as manufacturing, plantation, food and so on. Weighing scales are divided into several categories such as below.


1) Weighbridge / Truck Scale


2) Check Weigher


3) Label Scale


4) Weigh-Wrap System


5) Floor Scale


6) Counting Scale


7) Pricing Scale


8) Postal / Shipping Scale


9) Jewelry Scale


10) Bench Scale


11) Pocket Scale


12) Analytical Balance


13) Platform Scale


14) Crane Scale


15) Automatic Packing Machine


16) Automatic Print and Apply Labels System


17) Pallet Scale


18) Health Scale


19) Mechanical Scale


20) Spring Scale


21) Traditional Scale


22) Loadcell


23) Test Weight


Sources:
Aik Leong Dynamic Sdn. Bhd. link 1, link 2
OnlineScaleStore.blogspot.com

Cool Gadget / Widget for Blogspot


3D Label Cloud


3D Label cloud plug-in or know as "Cumulus" was originally designed for Wordpress by Roy Tanks. Now, it is available in Blogspot. Amanda from bloggerbuster was successfully converted this plug-in for use in Blogspot.

Get it here


Live Traffic Map


Live Traffic Map provides you and your readers with a real-time map showing where in the world your reader are. It accurately shows you the locations of all visitors to your site.

Get it here


Live Traffic Feed


Live traffic feed is a real-time tool-kit for blogger. It lets you watch your traffic in real time. In addition, it provide useful information to you such as below:
  • A new city or country visiting your site for the first time
  • A new website or web page sending you a visitor for the first time
  • Someone finding your site using a search term no one has ever used before
  • Your site breaking a new daily, hourly or per-minute traffic record
Get it here

Smarty and XAMPP configuration on Windows

Smarty is a web template engine for PHP. It is helpful for web project that are performs by different people(e.g. programmer and designer). Smarty separates PHP from HTML, application logic and content from its presentation.


Configuration:

1. Download the latest XAMPP version from http://www.apachefriends.org/

2. Install at C: directory. (C:\xampp)

3. Create a new folder in xampp folder and rename it to smarty. (C:\xampp\smarty)

4. Download the latest Smarty version from http://www.smarty.net/

5. Unzip the content of Smarty zip file to smarty folder. (C:\xampp\smarty)

6. Create two folders templates_c and cache inside it. (C:\xampp\smarty\templates_c and C:\xampp\smarty\cache)

7. Open php.ini file (C:\xampp\php\php.ini), search for Paths and Directories. At Windows part, replace the line

    include_path = ".;C:\xampp\php\pear\"
    with
    include_path = ".;C:\xampp\php\pear\;C:\xampp\smarty\libs\"

8. Create a new folder in htdocs folder and rename it to smarty. (C:\xampp\htdocs\smarty)

9. Create two folders configs and templates inside it. (C:\xampp\htdocs\smarty\configs and C:\xampp\htdocs\smarty\templates)

10. Smarty configuration is done. Create two scripts index.php and index.tpl to test Smarty template engine.

11. Place index.php inside C:\xampp\htdocs\smarty\ and index.tpl inside C:\xampp\htdocs\smarty\templates\

    index.php
    <?php
    // load Smarty library
    require('Smarty.class.php');
    $smarty = new Smarty;
    $smarty-»template_dir = 'C:/xampp/htdocs/smarty/templates';
    $smarty-»config_dir = 'C:/xampp/htdocs/smarty/config';
    $smarty-»cache_dir = 'C:/xampp/smarty/cache';
    $smarty-»compile_dir = 'C:/xampp/smarty/templates_c';
    $smarty-»assign('name','Penguin !!');
    $smarty-»display('index.tpl');
    ?>
    index.tpl
    <html>
    <body>
    Hello, {$name}
    <body>
    <html>

12. Open the web browser and type in the URL http://localhost/smarty


Documentation: http://www.smarty.net/docs.php
Reference: http://news.php.net/php.smarty.dev/2703


CAPTCHA

CAPTCHA stands for “Completely Automated Public Turing Test to Tell Computers and Human Apart”. It is a program to differentiate humans from computers for security and privacy purpose. CAPTCHA perform a task which a human can perform easily but require great computer processing power for that task. CAPTCHA is used to prevent worms and spam, search engine bots, website registration, comment spam in blogs and many more.

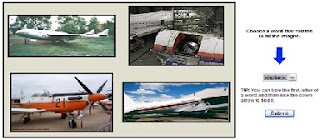
Nowadays, a variety methods of CAPTCHA are available in market, such as require responder to type in the distorted word that shown to them, listen to a distorted sound file over clustered background noise and type in the word or require responder to differentiate which image are related to the word given. Some form of CAPTCHA also require user to solve a very tough mathematic question. Those variety forms of CAPTCHA can be categorized into 5 categories:

  • Visual CAPTCHA
  • Image CAPTCHA
  • Audio CAPTCHA
  • 3D CAPTCHA
  • Question CAPTCHA

Visual CAPTCHA

Visual CAPTCHA are most wide applying on the internet today. Typically visual CAPTCHA will present a cluttered image of a string of characters to users and require users to type the characters. The string of characters can consist of either alphabet characters or alphanumeric characters, moreover the alphabet characters can be in upper case or lower case. The common techniques of this category CAPTCHA are text deformation, rotation, perturbation, colour variation, distortion, and words taken from dictionary words or arbitrary strings and many more.

  • reCAPTCHA
  • Baffle Text
  • Gimpy

Image CAPTCHA

Typical this type of CAPTCHA will present some images or pictures as well as shapes to the users. To past the test, users required to choose a word most related in the drop-down list box. Moreover some image CAPTCHA requires users to identify object among several images or click on the object in the image.

  • ASIRRA
  • PIX

Audio CAPTCHA

Audio types CAPTCHA using one or several speakers to present an audio file to the users. Users must carefully listen to the audio and enter the answer regarding to the audio. Currently audio CAPTCHA available in two format, spoken letters or digits at randomly spaced intervals and playing sounds related to an image. To enhance the security of the systems such as prevent unauthorized person using automatic speech recognition (ASR) programs to solve the CAPTCHA, audio need to be distorted or background noise is inserted into the audio. This type of CAPTCHA is mainly focus to the blind or low visual users.

  • Picture/Sound CAPTCHA
  • KillBot

3D CAPTCHA

Typically designing a program to recognize 3D objects are essentially difficult. In addition, by simply change the angle of images will result multiple images. Furthermore by random translation, rotation, scaling or lighting effects, the 3D objects will significantly change. Some computer security expert claim that this type of CAPTCHA as a solution to the weakness of existing CAPTCHA.

  • 3-D CAPTCHA
  • tEABAG_3D

Question CAPTCHA

Question CAPTCHA will ask responders a simple question to prove that the response is given by humans. What colour is the sky?, what are three plus four? are the samples of the questions asking in this type of CAPTCHA. Moreover, some require responders to solve a complex mathematic problem such as derivatives or polynomial factorization.

  • Ironclad
  • MAPTCHA


Subversion Configuration on CentOS


Requirements
  • Apache 2
  • Subversion
  • PHP 5 + Pear + VersionControl_SVN
  • MySql


Subversion Installation

1. Download and install the basic packages required by Subversion by using yum command in Terminal
    #yum install subversion mod_dav_svn php-mysql php-pear httpd
2. Create a repository directory at /var/svn
    #mkdir -p /var/svn/repos
    #chown –R apache:apache /var/svn/
3. Create a configuration repository directory at /var/svn/repos
    #svnadmin create /var/svn/repos/myrepos
    #chown –R apache.apache /var/svn/repos/myrepos


SVN Manager Installation

1. Download the latest version of SVN Manager from here
2. Extract the tar files to /var/www/html/svnmanager
    #tar –xvzf svnmanager-1.05.tgz
    #mv svnmanager-1.035 /var/www/html/svnmanager


Version Control Installation

1. Download and install VersionContol_SVN by using pear command in Terminal
    #pear install --alldeps VersionControl_SVN-0.3.0alpha1.tgz


MySql Configuration

1. Create database for SVN Manager
    #mysql –u root
    Mysql>create database svn;
    Mysql>grant all privileges on svn.* to 'svnmanager'@'localhost' identified by '[password]';
    Mysql>flush privileges;
    Mysql>quit;


SVN Manager Configuration

1. Add the following commands in /etc/httpd/conf/httpd.conf
    <Location /repos>
    DAV svn
    SVNParentPath /var/svn/repos
    AuthType Basic
    AuthName "Subversion Repository"
    AuthUserFile /var/svn/passwdfile
    AuthzSVNAccessFile /var/svn/accessfile
    Require valid-user
    </Location>

    <Directory "/var/www/html/svnmanager/">
    AllowOverride None
    Order deny,allow
    Deny from all
    Allow from all
    </Directory>
2. Create passwdfile and accessfile in /var/svn/ directory
    #touch /var/svn/passwdfile
    #touch /var/svn/accessfile
    #cd /var/svn
    #chown –R apache.apache passwdfile
    #chown –R apache.apache accessfile
3. Edit the commands as below in /var/www/html/svnmanager/config.php
    $htpassword_cmd = "/usr/bin/htpasswd";
    $svn_cmd = "/usr/bin/svn";
    $svnadmin_cmd = "/usr/bin/svnadmin";
    $svn_repos_loc = "/var/svn/repos";
    $svn_passwd_file = "/var/svn/passwdfile";
    $svn_access_file = "/var/svn/accessfile";

    $dsn = "mysql://svnmanager:[password]@localhost/svn";
4. Restart the Apache and Mysql with the following commands
    #service httpd restart
    #service mysqld restart
5. Open web browser and type in URL http://localhost/svnmanager


Using Subversion in Terminal

1. Make some test files
    #mkdir test1
    #cd test1
    #vim file1.cfg ~~ press Esc and Shift + z twice times to save
    #vim file2.cfg
2. Import project
    #svn import test1/ file:///var/svn/repos/myrepos -m "test file"
    Adding test1/file2.cfg
    Adding test1/file1.cfg
    Committed revision 1.
3. Check out
    #mkdir test2
    #svn co http://localhost/repos/myrepos
    A myRepos/file2.cfg
    A myRepos/file1.cfg
    Checked out revision 1.


** Subversion Configuration on Windows

Subversion Configuration on Windows


Subversion is an Open-Source Version Control System. It designed to make life easy. It helps in file and directory management. Instead of using pendrive or external hard disk to transfer or exchange projects with their team members, users need perform only few simple steps to update and commit their latest projects. Subversion operate across networks, means users from different location can combine their project with their members easily. In addition, it allows users to examine what was changed in the projects and review the progress of project.

Requirements
  • XAMPP-win32 version 1.7.1
  • TortoiseSVN version 1.6.3
  • Subversion-setup version 1.6.3
  • SVN Manager version 1.05

XAMPP Installation
  1. Download the latest XAMPP version from http://www.apachefriends.org
  2. Install to C:\xampp

TortoiseSVN Installation
  1. Download the latest version of TortoiseSVN from http://tortoisesvn.net
  2. Perform default installation
  3. Restart the computer

Subversion Installation
  1. Download the latest version of Subversion from http://subversion.tigris.org
  2. Install Subversion to C:\Program Files\Subversion\
  3. Create a SVN directory, C:\svn
  4. Create a SVN configuration directory, C:\svn\conf
  5. Create a SVN repository directory, C:\svn\repos
  6. Populate the SVN authentication file by compile htpasswd.exe in command prompt
    C:\xampp\apache\bin\htpasswd.exe -c C:\svn\conf\passwdfile username
  7. Create a repository by compile svnadmin.exe in command prompt
    C:\Program Files\Subversion\bin\svnadmin.exe create C:\svn\repos\myrepos
  8. Stop the Apache at XAMPP control panel
  9. Copy the following files from C:\Program Files\Subversion\bin to C:\xampp\apache\modules
    mod_dav_svn.so
    mod_authz_svn.so
  10. Open Apache httpd.conf file which is located at C:\xampp\apache\conf
  11. Make sure the following two commands are uncommented
    LoadModule dav_module modules/mod_dav.so
    LoadModule dav_fs_module modules/mod_dav_fs.so
  12. Add the following commands in httpd.conf
    #SVN
    LoadModule dav_svn_module modules/mod_dav_svn.so
    LoadModule authz_svn_module modules/mod_authz_svn.so

    #SVN
    <Location /repos>
    DAV svn
    SVNParentPath C:/svn/repos/
    AuthType Basic
    AuthName "Subversion Repository"
    AuthUserFile C:/svn/conf/passwdfile
    Require valid-user
    </Location>
  13. Start the Apache at XAMPP control panel
  14. If cant start the Apache, check the error by using the following command or try to restart the computer
    C:\xampp\apache\bin\apache.exe
  15. Open the web browser and type in the URL http://localhost/repos/myrepos, enter the username and password created above

SVN Manager Installation
  1. Download the latest SVN Manager version from http://svnmanager.sourceforge.net
  2. Extract the zip file to C:\xampp\htdocs\
  3. Rename the folder to svnmanager
  4. Rename the config.php.win file to config.php which is located inside svnmanager folder
  5. Open the config.php file and edit the command as shown as below
    //
    //SVNManager config.php file for Windows based servers
    //
    $htpassword_cmd = "c:\\Progra~1\\Apache~1\\Apache2\\bin\\htpasswd";
    $svn_cmd = "c:\\PROGRA~1\\Subversion\\bin\\svn";
    $svnadmin_cmd = "c:\\PROGRA~1\\Subversion\\bin\\svnadmin";

    //Subversion locations
    $svn_repos_loc = "c:\\svn";
    $svn_passwd_file = "c:\\svn\\svn_passwd_file";
    $svn_access_file = "c:\\svn\\svn_access_file";

    to

    //
    //SVNManager config.php file for Windows based servers
    //
    $htpassword_cmd = "c:\\xampp\\apache\\bin\\htpasswd";
    $svn_cmd = "C:\\Program Files\\Subversion\\bin\\svn";
    $svnadmin_cmd = "C:\\Program Files\\Subversion\\bin\\svnadmin";

    //Subversion locations
    $svn_repos_loc = "c:\\svn\\repos";
    $svn_passwd_file = "c:\\svn\\conf\\passwdfile";
    $svn_access_file = "c:\\svn\\conf\\accessfile";
  6. Uncomment and edit the following command
    //$dsn = "mysql://svnmanager:svnmgmpw@localhost/svnmanager";
    to
    $dsn = "mysql://svnmanager:svnmanager@localhost/svnmanager";
  7. Edit Apache httpd.conf file which is located at C:\xampp\apache\conf
    #SVN
    <Location /repos>
    DAV svn
    SVNParentPath C:/svn/repos/
    AuthType Basic
    AuthName "Subversion repository"
    AuthUserFile C:/svn/conf/passwd
    Require valid-user
    </Location>

    to

    #SVN
    <Location /repos>
    DAV svn
    SVNParentPath C:/svn/repos/
    AuthType Basic
    AuthName "Subversion Repository"
    AuthUserFile C:/svn/conf/passwdfile
    AuthzSVNAccessFile C:/svn/conf/accessfile
    Require valid-user
    </Location>
  8. Restart the Apache at XAMPP control panel
  9. Open the web browser and type in the URL http://localhost/svnmanager, login by enter the username = admin and password = admin. This username and password are for first time login only

    ** Example URL of repository : http://127.0.0.1/repos/myrepos

    ** Subversion Configuration on CentOS